How I Import My Meetings Into My Obsidian Daily Note
How I automate importing my Obsidian daily note’s meeting schedule from my Outlook calendar events.
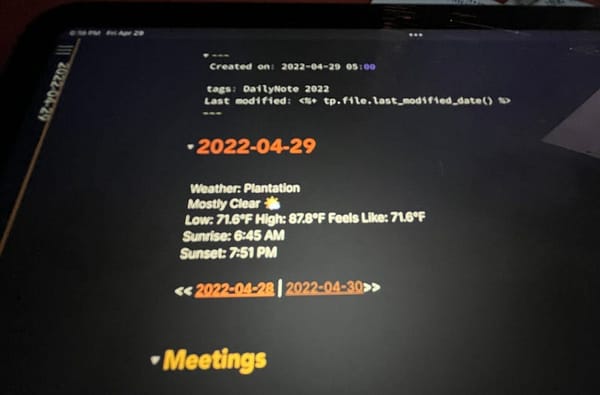
One of the things I did not like about my original Obsidian Daily Note Template was manually adding all my meetings each day. There are days where I would add the first meeting, then never add another. Then, when I get to the end of my day, I would end up back in Outlook, trying to figure out what I spent my time on. Let’s face it, if you’re not all in on this note-taking, it’s simply a waste of time, and it’s limitations like this that will keep you from using Obsidian daily notes over time.

So, I decided to figure out a way to automate importing my calendar events. I have a corporate Microsoft Exchange account, so I initially thought permissions would block me. My first thought was an API and some sort and a fetch call. I found Microsoft Graph but quickly realized that would be too much work for authentication etc., plus it would require building a plugin and middleware and more. Too much work for too little return.
Then I remembered that I saw somewhere that Obsidian could execute commands in the terminal and show the response. So I had to do a little searching to find what that was. That something ended up being the Templater plugin which I already use for my daily note template anyway. So this is where I started digging further.
I quickly found icalBuddy with a google search for “export my calendar to the terminal on macOS. So this was going to be easy after all.
Here’s what I did to get this working locally. In the end, it wasn’t too hard to set up. Unfortunately, it was not a simple install and be up and running, as you’ll see, but it is doable by anyone with no special programming needed.
This article only pertains to macOS. I don’t know if there’s a similar utility to icalBuddy in Windows. I’m sure there’s something similar. Leave a note in the comments if you know of one to help window folks out.
icalBuddy
icalBuddy is a command-line utility that can be used to get lists of events and tasks/to-do’s from the OS X calendar database (the same one iCal uses).
from icalBuddy website
iCalBuddy is a utility that you can run from the command line, and it will return your calendar’s events. Straight forward and just what I needed.
I downloaded icalBuddy and began playing around with it in my terminal. It worked as advertised, so I spent some time tweaking the options to get the output as close as possible to my original note’s layout for the meetings. Everything worked, so I moved it over to the Templater plugin (we’ll cover how below) and ran it in Obsidian. It didn’t work.
I ran into a permissions issue that is related to Mojave and up versions of macOS. When running icalBuddy in Obsidian, the app does not have permission to access the calendars. Unfortunately, it doesn’t ask for permission either. My heart sank when I got this far and realized it wouldn’t work as planned. Luckily, after a bit of searching, I uncovered someone else with a similar issue in a GitHub issue for Keyboard Maestro. In that thread, I found a link to a fork of icalBuddy where someone had fixed the problem. I downloaded that executable, and we were back in business.
So to install iCalBuddy and use it in Obsidian, you need to do a little more than unzip it and install it. Follow these steps:
1. Download the icalBuddy Zip file. https://hasseg.org/icalBuddy/
2. Download a fixed version of the executable from the Keyboard Maestro Forum post. https://forum.keyboardmaestro.com/t/icalbuddy-doesnt-work-within-keyboard-maestro-mojave-calendar-permissions/15446/6
3. Extract the zip file from the first download
4. Copy the file from the second download into the extracted folder
5. Double click the install file
That’s it. You’re halfway there. We now have the utility installed that will call the calendar and get the events. Now we need to add it to Obsidian via the Templater plugin.
Templater Plugin
If you’re not already using Templater, go ahead and install it following their instructions.
Once you have Templater installed, make sure you are using it for your daily note template, as that template is where we will insert our daily calendar events.
Since we want to run a terminal command and display the output, we use Templater’s user functions.

In Obsidian’s settings, scroll down to Plugin Options and select Templater.
Scroll down to the User System Command Functions section.
Then, switch on the setting for Enable User System Command Functions.
Set the timeout to 20. This timeout allows icalBuddy the time to get the info without throwing an error.
Add a User Function name dailyEvents on the left side of User Function N1.
Add the following command to the text box on the right side of User Function N1.icalBuddy -npn -nc -ps "/: /" -iep "datetime,title" -po "datetime, title" -b "\n\n### "-tf "%H%M" -ic "Calendar" eventsToday
note -ic “Calendar” is for including a calendar by name. Either rename or remove if needed.
Add to Daily Note Template

Replace the Meetings section of the template with:## Meetings
<% tp.user.dailyEvents() %>
Now, when you create a new daily note, the call will be made to icalBuddy, and the above template will populate with today’s events from your calendar.
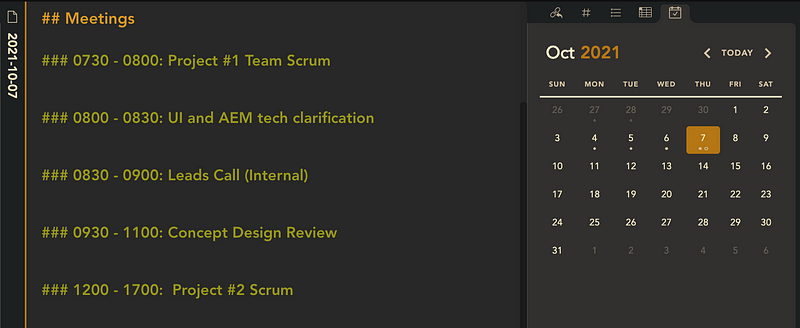
The output with the options above will look something like this:### 0730–0800: Track 1 Team Scrum### 0800–0830: UI and AEM tech clarification### 0830–0900: Leads Call (Internal)### 0930–1100: CDR — Concept Design Review### 1200–1700: Other Project### 1300–1315: Submit Timesheet by 6PM ET

I have created the icalBuddy command using the options below. These options format the calendar events like I originally formatted them manually in my original daily note template. The only difference is I now have an ending time along with the starting time. You could turn this off with the -eed option (exclude end date-times), but having the ending time helps me count up my hours at the end of a day.
Here is a list of the options used above. You can get a complete list of options on icalBuddy’s homepage.-npn No property names
-nc No Calendar Names
-ps Set property separators (value required)
-iep Include event properties (value required)
-po Set property order (value required)
-b Set bullet point (value required)
-tf Set time format (value required)
-ic Include calendars (value required)
That’s it. You will now see your calendar’s events when you create your daily note when you start your day. This minor difference goes a long way in making the daily note more appealing to use in general. For example, I would sometimes not even create my note until three meetings into my day. Now I know my meetings are there and up to date as soon as I create the note. This type of change is the difference-maker in whether you stick to a system like this or not.
Let me know in the comments how you format your meetings. I’m always looking for inspiration. Now that I know this works, I will look into other command-line utilities that can get me the info in my notes to make my life easier. Follow me for more.
Some items of note
This only works if you create the note on the same day the note is intended for. There is an option to pass dates and use a different icalBuddy command. This works for my flow, but if you set up notes in advance, you can check the icalBuddy docs for the other command and pass the dates.
This only works for a Mac. Apologies to my Windows friends.